DNS Server Setup Guide Using BIND9
 NeeRoz M
DNS Server Setup Guide Using BIND9


This guide walks through setting up an authoritative DNS server on Ubuntu or Debian Linux using BIND9.
1. What is DNS?
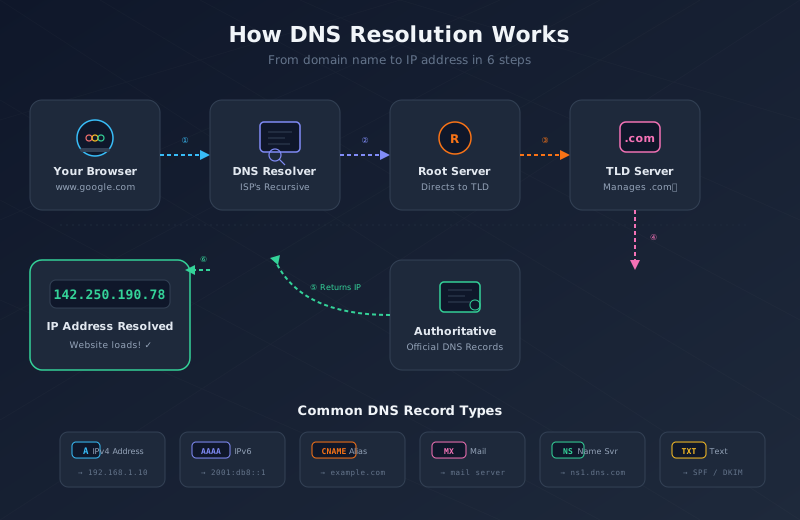
DNS, or Domain Name System, translates human-readable domain names into IP addresses.
For example:
example.com → 192.0.2.20
Without DNS, users would need to remember IP addresses instead of domain names.
2. Important DNS Terms
| Term | Definition |
|---|---|
| DNS server | A server that answers domain-name lookup requests |
| BIND9 | Popular DNS server software for Linux |
| Domain | A name such as example.com |
| Zone | A section of the DNS namespace managed by a DNS server |
| A record | Maps a domain name to an IPv4 address |
| AAAA record | Maps a domain name to an IPv6 address |
| CNAME record | Creates an alias for another domain name |
| MX record | Specifies the mail server for a domain |
| NS record | Identifies the authoritative DNS server |
| SOA record | Contains administrative information about a DNS zone |
| Authoritative DNS server | Provides official DNS records for a domain |
| Recursive DNS server | Finds DNS answers on behalf of clients |
| TTL | The amount of time DNS information may be cached |
| Glue record | Connects a nameserver hostname to its IP address |
This guide configures an authoritative DNS server.
3. Requirements
You need:
- Ubuntu or Debian Linux server
- Static public IP address
- Registered domain name
- Access to your domain registrar
- Permission to open TCP and UDP port
53
Example values used below:
Domain:         example.com
DNS server:     ns1.example.com
DNS server IP:  192.0.2.10
Web server IP:  192.0.2.20
Mail server IP: 192.0.2.30
Replace these example values with your actual information.
4. Update the Server
sudo apt update
sudo apt upgrade -y
Set the server hostname:
sudo hostnamectl set-hostname ns1.example.com
Edit the hosts file:
sudo nano /etc/hosts
Add this line:
192.0.2.10 ns1.example.com ns1
Save the file:
- Press
Ctrl + O - Press
Enter - Press
Ctrl + X
5. Install BIND9
Install BIND9 and DNS testing tools:
sudo apt install bind9 bind9utils bind9-doc dnsutils -y
Start BIND9:
sudo systemctl start bind9
Enable it to start automatically after reboot:
sudo systemctl enable bind9
Check its status:
sudo systemctl status bind9
6. Configure BIND9 Options
Open the BIND9 options file:
sudo nano /etc/bind/named.conf.options
Use this configuration:
options {
    directory "/var/cache/bind";

    listen-on { 127.0.0.1; 192.0.2.10; };
    listen-on-v6 { none; };

    recursion no;
    allow-query { any; };

    dnssec-validation auto;
};
Configuration definitions
directory: Location used by BIND9 for temporary files.listen-on: IP addresses on which BIND9 accepts DNS requests.listen-on-v6: IPv6 listening configuration.recursion no: Prevents the server from becoming an open recursive resolver.allow-query { any; };: Allows public DNS queries.dnssec-validation auto: Enables DNSSEC validation support.
Replace 192.0.2.10 with your DNS server’s IP address.
7. Configure the DNS Zone
A DNS zone contains all DNS records for a domain.
Open the local BIND9 configuration file:
sudo nano /etc/bind/named.conf.local
Add:
zone "example.com" {
    type master;
    file "/etc/bind/db.example.com";
};
Configuration definitions
zone "example.com": Defines the domain being managed.type master: Makes this server the primary authoritative DNS server.file: Specifies the location of the zone database file.
8. Create the Zone File
Copy the default zone file:
sudo cp /etc/bind/db.empty /etc/bind/db.example.com
Open the new file:
sudo nano /etc/bind/db.example.com
Replace its contents with:
$TTL 86400

@       IN      SOA     ns1.example.com. admin.example.com. (
                        2026083101 ; Serial
                        3600       ; Refresh
                        1800       ; Retry
                        604800     ; Expire
                        86400 )    ; Negative Cache TTL

        IN      NS      ns1.example.com.

ns1     IN      A       192.0.2.10
@       IN      A       192.0.2.20
www     IN      A       192.0.2.20
mail    IN      A       192.0.2.30

@       IN      MX      10 mail.example.com.

@       IN      TXT     "v=spf1 mx -all"
DNS record definitions
SOA record
@ IN SOA ns1.example.com. admin.example.com.
The Start of Authority record identifies the primary DNS server and administrator.
The email address:
admin.example.com.
represents:
[email protected]
The first dot replaces the @ symbol.
NS record
IN NS ns1.example.com.
Specifies the authoritative nameserver for the domain.
A record
www IN A 192.0.2.20
Maps:
www.example.com → 192.0.2.20
MX record
@ IN MX 10 mail.example.com.
Specifies the mail server for example.com.
The number 10 is the mail server priority. Lower numbers have higher priority.
TXT record
@ IN TXT "v=spf1 mx -all"
A TXT record can store verification information or email security policies such as SPF.
9. Validate the Configuration
Check the main BIND9 configuration:
sudo named-checkconf
If there is no output, the configuration is valid.
Check the zone file:
sudo named-checkzone example.com /etc/bind/db.example.com
Expected result:
zone example.com/IN: loaded serial 2026083101
OK
10. Restart the DNS Server
sudo systemctl restart bind9
Check for errors:
sudo journalctl -u bind9 --no-pager -n 50
11. Open DNS Ports
DNS uses:
- UDP port 53
- TCP port 53
If UFW is enabled, run:
sudo ufw allow 53/udp
sudo ufw allow 53/tcp
sudo ufw reload
If the server is hosted with a cloud provider, also open ports 53/UDP and 53/TCP in the provider’s firewall or security group.
Check that BIND9 is listening:
sudo ss -tulpn | grep :53
12. Test the DNS Server
Test the domain directly against your DNS server:
dig @192.0.2.10 example.com
Test the web record:
dig @192.0.2.10 www.example.com
Test the mail record:
dig @192.0.2.10 MX example.com
You can also use:
nslookup example.com 192.0.2.10
A successful response should contain an ANSWER SECTION.
13. Register the Nameserver
At your domain registrar, create a child nameserver, also called a glue record:
Nameserver: ns1.example.com
IP address: 192.0.2.10
Then set your domain’s nameserver to:
ns1.example.com
For production use, configure at least two nameservers:
ns1.example.com → 192.0.2.10
ns2.example.com → SECOND_DNS_SERVER_IP
The second DNS server should ideally be located on a different network or provider.
14. Verify Public DNS
Check the domain’s nameservers:
dig NS example.com
Check the domain’s IP address:
dig A example.com
Trace the complete DNS resolution process:
dig +trace example.com
Check the nameserver directly:
dig @ns1.example.com example.com
15. Updating DNS Records
Whenever you modify the zone file, increase the serial number.
For example:
2026083101 ; Serial
Change it to:
2026083102 ; Serial
Then validate and reload BIND9:
sudo named-checkzone example.com /etc/bind/db.example.com
sudo rndc reload
The serial number tells secondary DNS servers and caches that the zone has changed.
16. Common Problems
Configuration error
Run:
sudo named-checkconf
Zone file error
Run:
sudo named-checkzone example.com /etc/bind/db.example.com
DNS server not responding
Check whether BIND9 is running:
sudo systemctl status bind9
Check whether port 53 is open:
sudo ss -tulpn | grep :53
Check the firewall:
sudo ufw status
DNS changes are not visible
Increase the SOA serial number and reload:
sudo rndc reload
DNS caches may continue showing old results until the TTL expires.
Domain does not resolve publicly
Check that:
- The glue record is configured.
- The registrar uses the correct nameserver.
- Port 53 UDP and TCP are open.
- The server has a public IP address.
- The zone name is correct.
- The NS and SOA records are valid.
- The DNS server is reachable from the Internet.
Conclusion
This setup creates a basic authoritative DNS server for example.com using BIND9. Your domain is now hosted on your own nameserver, giving you full control over your DNS records.
Table of Contents